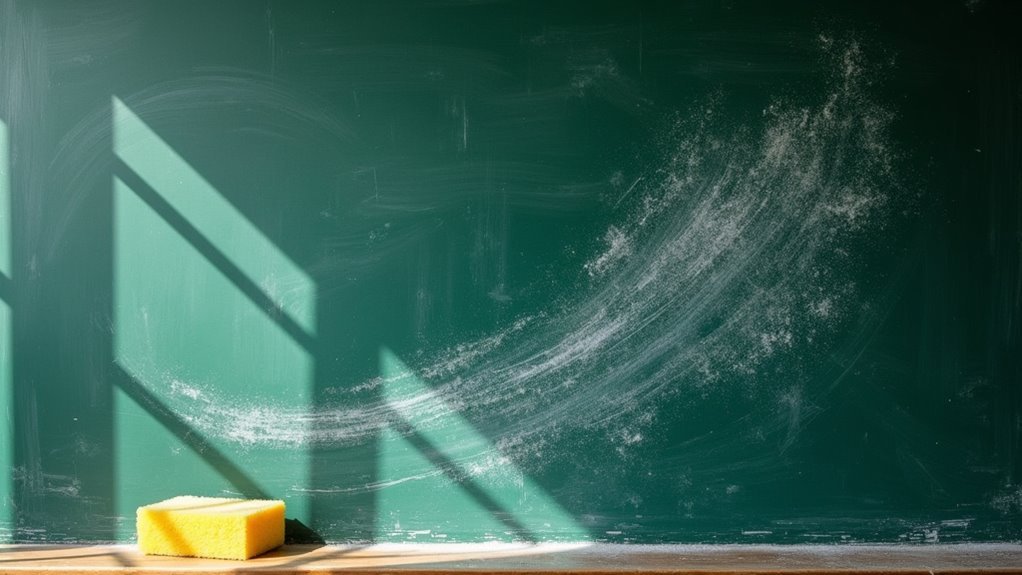
Cleaning a chalkboard might seem old-school in a world of screens and whiteboards, but these classic boards are still found in many places – from classrooms to coffee shops. Whether you're writing daily specials or helping with homework, keeping your chalkboard clean matters. According to Melissa Maker, cleaning expert and founder of Clean My Space, "The key to maintaining a chalkboard is regular cleaning – at least once a week – to prevent chalk dust from building up and becoming harder to remove." Let's look at how to keep these teaching tools looking fresh and clear, from daily wipe-downs to getting rid of tough chalk marks. With the right steps, anyone can make their chalkboard look good as new.
Some of the links in this article may be affiliate links. If you make a purchase through these links, we may earn a small commission at no extra cost to you. Thank you.
Daily Chalkboard Use Tips

While maintaining a chalkboard might seem straightforward, daily care makes a significant difference in its longevity and usability.
We recommend using a microfiber cloth for effective removal of chalk dust, wiping in horizontal motions from top to bottom.
Let the board air-dry completely before writing again, and don't forget to clean away excess chalk daily.
Regular cleaning prevents buildup and guarantees a clear writing surface.
##
Let's look at what you should and shouldn't do when cleaning your chalkboard, along with the essential steps to get it sparkling clean.
We'll start with proper cleaning techniques using vinegar solution and microfiber cloths, while avoiding harsh chemicals and excessive moisture that could damage the board's surface.
Our goal is to help you maintain your chalkboard effectively, whether you're cleaning it daily or doing a deep clean every few weeks.
Things to Do When Cleaning a Chalkboard
Maintaining a clean chalkboard is essential for clear visibility and continued functionality. The cleaning process requires systematic attention to detail, starting from the top and working downward to prevent dust from settling on already cleaned areas.
Using the proper tools and techniques guarantees the best results while protecting the chalkboard's surface from damage.
- Use a clean eraser or microfiber cloth, working from top left to bottom right in horizontal motions
- Remove all loose chalk dust with dry cleaning method before applying any liquid solution
- Mix white vinegar and water solution (1:8 ratio) for stubborn marks
- Apply cleaning solution with a well-wrung cloth to avoid board saturation
- Wipe consistently in horizontal strokes to prevent streaking and dust dispersal
- Clean the entire surface systematically to guarantee uniform results
- Dry thoroughly with an absorbent cloth immediately after cleaning
- Allow complete air-drying before using the chalkboard again
Things to Avoid When Cleaning a Chalkboard
When cleaning a chalkboard, it's essential to use proper techniques and materials to maintain its functionality and appearance while preventing damage.
Improper cleaning methods can permanently harm the surface, reduce its ability to hold chalk markings clearly, or even render the board unusable over time.
- Abrasive cleaners and scrub pads – These can create permanent scratches that trap chalk dust and affect writing clarity.
- Excessive water or cleaning solutions – Can cause warping and deterioration of the chalkboard's underlying material.
- Bleach and harsh chemical cleaners – Will damage the board's surface coating and may cause discoloration.
- Circular wiping motions – Spreads chalk dust around instead of removing it, making the cleaning process ineffective.
- Dirty or contaminated cleaning cloths – Transfers dirt and oils back onto the surface, defeating the purpose of cleaning.
Steps
Maintaining a clean chalkboard is essential for clear visibility and ideal functionality in any educational or professional setting.
A proper cleaning routine not only extends the life of your chalkboard but also guarantees that new writing remains crisp and legible, making it easier for everyone to read and understand the content.
Step 1: Erase the chalkboard thoroughly using a clean chalkboard eraser, working from the upper left corner to the lower right in horizontal strokes.
Step 2: If no eraser is available, use a dry microfiber cloth to remove chalk residue.
Step 3: Create a cleaning solution by combining half a cup of distilled white vinegar with four liters of warm water.
Step 4: Dampen a clean microfiber cloth in the vinegar solution, making sure to wring out excess liquid.
Step 5: Wipe the board from side to side in one continuous motion, avoiding circular movements.
Step 6: Dry the chalkboard completely using a clean, absorbent cloth or allow it to air dry.
Step 7: Inspect the surface to confirm no residue or streaks remain before using the board again.
Final Thoughts
Because a clean chalkboard is essential for effective communication, proper maintenance shouldn't be overlooked.
We recommend regular cleaning every 2-3 weeks using our DIY chalkboard cleaner made with distilled white vinegar.
Remember to use horizontal strokes from top to bottom, guarantee the board's completely dry, and tackle stubborn marks promptly.
With consistent care, you'll minimize chalk residue and maintain a pristine writing surface.
##
Regular chalkboard maintenance isn't just about aesthetics – it's essential for preserving the writing surface and ensuring clear visibility.
By following proper cleaning techniques, using appropriate cleaning solutions, and maintaining a consistent cleaning schedule, your chalkboard will remain a reliable writing surface for years to come.
Remember that prevention is key. Using quality materials like dustless chalk, cleaning after each use, and addressing stains promptly will minimize the need for deep cleaning.
Whether in a classroom, office, or home setting, a well-maintained chalkboard creates a better experience for everyone who uses it.
Start implementing these cleaning practices today to protect your chalkboard investment and maintain its functionality.
Your future self will thank you for the time and effort invested in proper chalkboard care.