Picture walking into a bathroom with tiny hair bits everywhere – that's a clear sign your hair clippers need cleaning! Just like you wash your dishes after a meal, clippers need regular cleaning to work their best. When clippers get dirty, they start pulling hair instead of cutting it smoothly, and nobody wants that.
Some of the links in this article may be affiliate links. If you make a purchase through these links, we may earn a small commission at no extra cost to you. Thank you.
According to Chris Applegate, a master barber at Sport Clips, "Clean clippers cut better and last longer. A simple five-minute cleaning routine after each use can double the life of your clippers."
Dirty clippers aren't just bad for your haircuts – they can spread germs and cause skin problems. Think about it: would you want someone using dirty scissors to cut your hair? The same goes for clippers. When hair and oil build up on the blades, they get dull and stop working as well as they should.
The good news is that keeping clippers clean isn't rocket science. With basic care, you can keep your clippers cutting smoothly and make them last much longer. Plus, clean clippers mean better haircuts, which is what everyone wants, whether you're cutting your own hair or someone else's.
Professional Tools Need Maintenance
When it comes to professional hair clippers, proper maintenance isn't just a suggestion – it's essential for success.
We need to clean our clippers daily, brush away hair after each use, and apply oil to keep the blades sharp.
Regular maintenance includes weekly deep cleaning with disinfectant and checking blade alignment.
Let's make sure we're providing the best service by keeping our professional tools in top condition.
##
Let's explore the key aspects of proper clipper cleaning to keep our tools in top condition and maintain hygiene standards.
We'll start by looking at essential cleaning steps and common mistakes to avoid, ensuring you're equipped with the right knowledge to care for your clippers effectively.
Our guide will walk you through best practices, safety precautions, and expert tips that'll help extend the life of your equipment while keeping it sanitized for each use.
Things to Do When Cleaning clippers
Maintaining clean hair clippers is essential for both hygiene and performance. Proper cleaning not only extends the life of your clippers but also guarantees safe and effective grooming sessions while preventing the spread of bacteria and infections.
A thorough cleaning routine involves several critical steps that must be performed in the correct order to achieve ideal results.
- Disconnect power – Remove the clipper from any power source to prevent accidents during cleaning
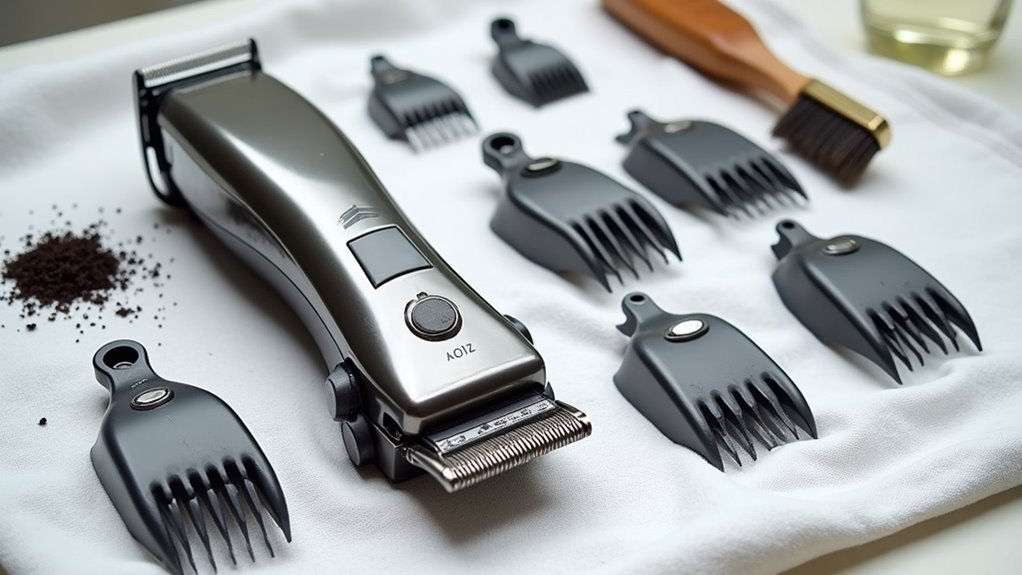
- Remove attachments – Take off all guards, combs, and detachable parts for separate cleaning
- Brush away debris – Use a cleaning brush to remove loose hair and particles from blades and housing
- Disinfect thoroughly – Apply clipper cleaner or alcohol solution to sanitize all surfaces and blades
- Dry completely – Allow all parts to air dry fully before reassembly
- Oil the blades – Apply clipper oil to moving parts to maintain smooth operation
- Reassemble carefully – Put all components back together, guaranteeing proper alignment
- Test operation – Run the clipper briefly to guarantee proper function and distribute oil
Things to Avoid When Cleaning clippers
When cleaning hair clippers, it's crucial to understand that improper cleaning techniques can greatly reduce their lifespan and performance.
Using incorrect methods or materials can damage the blades, motor, and other crucial components, ultimately leading to costly repairs or replacements.
- Direct water contact – Can cause rust formation on the blades and electrical components
- Cotton swabs or cotton-based materials – Leave behind lint that can interfere with blade movement
- Excessive lubrication – Creates buildup that attracts debris and affects cutting efficiency
- Heavy-duty oils like WD-40 – Clogs moving parts and damages the clipper's internal mechanisms
- Disregarding manufacturer instructions – Leads to improper maintenance and potential warranty issues
- Using harsh cleaning solutions – Can corrode metal parts and damage plastic components
- Submerging clippers in cleaning solution – Risks electrical damage and internal corrosion
- Aggressive scrubbing of blades – May cause misalignment or damage to cutting edges
- Skipping regular cleaning sessions – Results in buildup of hair and debris that affects performance
- Using compressed air too closely – Can force debris deeper into the mechanism or damage components
Steps
Proper clipper maintenance is essential for achieving clean cuts and extending the life of your grooming tools. Regular cleaning not only guarantees peak performance but also maintains hygiene standards by preventing the buildup of hair, skin cells, and bacteria that can accumulate during use.
By following a systematic cleaning routine, you can keep your clippers in pristine condition and avoid potential skin irritations or uneven cuts.
Step 1: Unplug the clippers from the power source to prevent accidents during cleaning
Step 2: Remove all attachable guards from the clippers
Step 3: Use a cleaning brush to remove loose hair and debris from the blades
Step 4: Apply antibacterial clipper cleaner or 70% isopropyl alcohol to disinfect the blades
Step 5: Let the disinfectant air dry completely
Step 6: Turn on the clippers and apply 1-2 drops of clipper oil to the blades while running
Step 7: Wipe off any excess oil with a clean cloth
Step 8: Once weekly, unscrew the blades for deep cleaning with disinfectant
Step 9: Allow all components to dry thoroughly before reassembling
Step 10: Test the clippers briefly to verify proper reassembly and function
Final Thoughts
Regular care of your clippers will pay off in the long run, both for your wallet and your grooming results.
We can't stress enough how essential to keeping your equipment in top shape cleaning your clippers is.
Through proper maintenance, deep clean sessions, and consistent use of clipper oil and disinfectant solution, you'll prevent rust, extend the lifespan, and guarantee peak cutting results.
##

Proper clipper maintenance is essential for achieving great haircuts and extending the lifespan of your tools. By following these cleaning practices – regular brushing, consistent oiling, weekly deep cleaning, using compressed air between cuts, and proper storage – you'll keep your clippers in prime condition.
Clean clippers not only perform better but also provide a more hygienic grooming experience. Start implementing these maintenance habits today, and you'll notice the difference in both the quality of your cuts and the longevity of your clippers.
Take the first step by creating a simple cleaning routine. Your clippers – and whoever's hair you're cutting – will thank you for it.